

This post may contain affiliate links. Please read our disclosure policy.
These Pumpkin Protein Brownies are fudgy, flourless and egg-free, made with pumpkin puree, peanut butter, cocoa, maple syrup and chocolate protein powder. A peanut butter topping finishes every pan.

These pumpkin protein brownies have become a favorite snack for my kids. In my house they’re an afternoon staple: my daughter eats them as a healthy afternoon snack, and now my son does too.
When I’m watching what I eat, I still want something chocolatey, and these flourless protein brownies are what I reach for. I enjoy them as a healthier alternative to a regular brownie, since they have protein and less sugar in them than standard brownies. The peanut butter topping makes them taste like a real treat.
If you’ve been looking for pumpkin brownies with protein powder that you can mix in one glass bowl with a hand mixer and bake in a 9×9 pan, this is the recipe. There’s no flour to measure and no eggs to crack, and a pan in the fridge means a healthy pumpkin brownie is ready whenever someone asks for a snack.
Pumpkin Protein Brownies
There’s no flour in these pumpkin protein brownies. The protein powder, cocoa and pumpkin puree do the work, the maple syrup sweetens the batter, and the peanut butter keeps everything rich and fudgy. The peanut butter and butter topping goes on after the brownies cool, and I always add it.
Why You’ll Love These Pumpkin Protein Brownies
There’s a lot to love about these pumpkin protein brownies, and the first thing is how simple they are. They’re no flour brownies with no eggs, so the batter is just pumpkin, peanut butter, maple syrup, cocoa, protein powder and spices. I mix everything in one glass bowl with my KitchenAid hand mixer (a stand mixer works too, and so does stirring by hand), spread it in the pan and bake.
The second thing is how they fit into our days. They’re fudgy rather than cakey, they’re meant to look a little underbaked in the center, and the fridge firms them into dense, chocolatey squares.
Because I keep a pan of these pumpkin protein brownies in the fridge, there’s always a healthy snack for kids (and for me) ready to grab, and the peanut butter topping makes each square feel like a real dessert.
Equipment You’ll Need
To make these Pumpkin Protein Brownies, you’ll need:

The Organic Ingredients I Use
Here’s what I reach for. For these pumpkin protein brownies I use Nothing But The Truth organic canned pumpkin, or my own homemade pumpkin puree. My peanut butter is Kirkland organic peanut butter, and my protein powder is Orgain Organic Chocolate Protein powder.
If you’d rather use whey, it works too, and my favorite is Just Ingredients, because their whole line is organic and grass-fed.
Ingredient Notes
The exact amounts are in the recipe card below. Here is what each ingredient does.
- Pumpkin puree – Plain canned pumpkin or homemade puree keeps the brownies moist and fudgy. If you make your own, drain off any extra moisture before you measure it. Use plain pumpkin, never pumpkin pie filling.
- Natural peanut butter – The peanut butter gives the batter its richness and fudgy texture. I use Kirkland organic peanut butter. Stir it well before you measure it.
- Unsweetened cocoa powder – This is where the deep chocolate flavor comes from.
- Maple syrup – It sweetens the batter and adds moisture. I like the warm, earthy flavor with pumpkin.
- Chocolate protein powder – This works like the flour in a regular brownie, which is what makes these protein brownies flourless, so please don’t skip it. I use Orgain Organic Chocolate Protein powder. Whey works too, and I recommend Just Ingredients, which is organic and grass-fed.
- Vanilla extract – Rounds out the chocolate.
- Sea salt – Balances the sweetness.
- Pumpkin pie spice and cinnamon – Warm fall spice, with a little extra cinnamon.
For the peanut butter topping:
- Natural peanut butter – Melted with the butter into a smooth layer that spreads easily and sets in the fridge.
- Butter – Just 1 tablespoon, to loosen the peanut butter so it spreads. I don’t recommend or use a plant-based butter here.
- Chocolate chips (optional) – I sprinkle a handful on top for dimension, and they’re mostly there to make the brownies look pretty. Skip them if you’d like less sugar.
How to Make Pumpkin Protein Brownies
- Prep the pan. Preheat the oven to 325°F (160°C). Spray a 9×9-inch baking pan with avocado oil spray, or line it with parchment paper.
- Mix the wet ingredients. In a clear glass mixing bowl, use a KitchenAid hand mixer to mix the pumpkin puree, peanut butter, maple syrup and vanilla until smooth. (A stand mixer works too, and so does mixing by hand.)

- Add the dry ingredients. Add the cocoa powder, protein powder, sea salt, pumpkin pie spice and cinnamon, and mix until the batter is smooth and thick.


- Spread it in the pan. Scrape the batter into the prepared pan and spread it evenly with an offset spatula.

- Bake. Bake for 20 to 25 minutes, and check at 20 minutes. The edges should look set, and the middle should still be slightly soft.
- Cool in the pan. Let the brownies cool in the pan for 30 to 45 minutes before you add the topping.

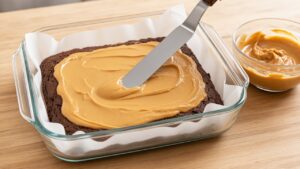
- Add the peanut butter topping. Melt 1/4 cup peanut butter and 1 tablespoon butter in a small glass bowl in the microwave for about 20 seconds, then stir until smooth. Spread it over the cooled brownies with an offset spatula, and sprinkle on a handful of chocolate chips if you like.

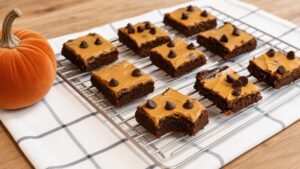
- Chill and cut. Once the topping is on, refrigerate the pan for about 2 hours, until the brownies are firm. Cut them into 15 pieces, 3 across and 5 down.

Tips for the Best Pumpkin Protein Brownies
A few things I’ve learned that help these flourless pumpkin protein brownies turn out well every time.
Use room-temperature peanut butter and pumpkin. Cold ingredients are harder to mix smooth, so take them out of the fridge a little ahead of time.
Stir the peanut butter before you measure. The oil separates in the jar. Stirring it back in means the batter and the topping are creamy and even.
Mix in a clear glass bowl. You can see the bottom of the bowl, so it’s easy to tell when no pumpkin or peanut butter is hiding there. Scrape the sides once or twice.
Leave a parchment overhang. If you line the pan, let the paper hang over two sides. After the brownies are chilled you can lift the whole slab out onto a cutting board.
Warm the topping gently. Twenty seconds is usually enough to loosen it. If the peanut butter is hot and runny, let it sit a minute before you spread it so it doesn’t slide off.
Use a sharp knife and wipe it between cuts. Chilled brownies with a topping cut best with a clean knife, so wipe off the peanut butter every few cuts.
Using an 8×8 pan? It works. The brownies will just be a bit thicker than they are in a 9×9 pan, so check them at 20 minutes and give them a few more minutes if the center looks wet.

Mistakes to Avoid when making Pumpkin Protein Brownies
Using pumpkin pie filling. Pie filling is already sweetened and spiced, which throws off the whole recipe. Always grab plain pumpkin puree.
Overbaking them. They’re meant to look a little underbaked in the center, and the fridge firms them up. If you bake them until the middle looks completely dry, you’ll lose the fudgy texture.
Adding extra protein powder. It’s tempting to add more, but the powder soaks up moisture. Measure 1/3 cup, level it off, and stop there.
Topping the brownies while they’re warm. Give them the full 30 to 45 minutes in the pan first. A warm pan melts the topping into a puddle instead of a smooth layer.
Cutting them before they’re chilled. Straight from the oven, they’re soft. Chill them for about 2 hours so the brownies and the topping can firm up.
Skipping the pan prep. The batter is sticky. Spray the pan with avocado oil spray or line it with parchment, or you’ll be chasing brownies out of the corners.
Different swaps and variations when making pumpkin protein brownies
Maple syrup or honey. If you’re avoiding cane sugar, maple syrup and honey are interchangeable here. They taste different, though: maple has a warm, earthy flavor, and honey tastes more floral.
Protein powder. I use Orgain Organic Chocolate Protein powder. Whey works too, and Just Ingredients is the brand I love.
Peanut butter. I haven’t tried another nut butter, because I prefer peanut butter. A different nut butter should still work, and it won’t change the structure of the brownies, but I stick with peanut butter and can’t tell you how another one tastes.
Add-ins. You can stir a handful of chocolate chips, chopped nuts or dried cranberries into the batter before baking.
Chocolate chips on top. Totally optional. I add them for dimension, and if you want less sugar, leave them off.

Serving Ideas
A few ideas for how to enjoy these pumpkin protein brownies: pack a square in a lunchbox, grab one after practice, or enjoy one with a cup of tea in the afternoon. They also make an easy dessert after dinner, and a pan of them is handy for a healthy snack for kids after school.
How to Store Pumpkin Protein Brownies
Fridge: Store the pumpkin protein brownies in an airtight glass container in the fridge for up to 5 days. I prefer them chilled, and the fridge keeps the peanut butter topping set.
Counter: If you’ll eat them within a day or two, an airtight glass container on the counter is fine, but the topping is firmest in the fridge, which is how we really like to enjoy pumpkin protein brownies.
Freezer: Freeze the cut squares in a single layer on a parchment-lined tray until firm, then move them to a freezer-safe glass container with parchment between the layers for up to 3 months. Thaw for a few minutes on the counter.

FAQs for Pumpkin Protein Brownies
Why are protein brownies dry, chalky or rubbery?
The two most common reasons are too much protein powder and overbaking. Protein powder soaks up moisture like flour does, and heat tightens protein, so extra powder or extra time in the oven can leave brownies dense, dry or rubbery. Fat from the peanut butter and moisture from the pumpkin help, which is why these pumpkin protein brownies call for a level 1/3 cup of powder and come out of the oven while the center is still soft.
Does the type of protein powder matter in protein brownies?
Yes, it can. Whey isolate, whey and casein blends, and plant-based powders absorb liquid differently, so the same recipe can turn out thicker or thinner depending on the brand. I make these pumpkin protein brownies with Orgain Organic Chocolate Protein powder, and I know whey works too. I haven’t tested other powders, so use a chocolate powder, measure it level, and go by the thick, spreadable batter in the photos.
Do protein brownies taste like protein powder?
Most of the flavor in these comes from cocoa, maple syrup, peanut butter and pumpkin pie spice, so they taste like a fudgy chocolate peanut butter brownie with a little pumpkin spice. The powder does add its own flavor, though, so choose one you like the taste of. A chocolate powder you enjoy in a shake will taste the same once it’s baked.
How much protein is in each pumpkin protein brownie?
Protein brownies you find online range from about 6 to 13 grams of protein per serving, depending on the recipe. Mine are on the lower end: about 5 to 6 grams per brownie with the peanut butter topping, if you cut the pan into 15 pieces. That’s an estimate, and it depends on your protein powder. They have protein and less sugar in them than standard brownies, which is why I like having one as a snack or an easy dessert.
Are pumpkin protein brownies gluten-free?
These are flourless protein brownies, so there’s no wheat flour in the batter. I haven’t made them with gluten-free certified ingredients, though, and they aren’t labeled gluten-free. If you need them to be, check the labels on the protein powder, cocoa, peanut butter and chocolate chips.
Can I make pumpkin protein brownies without protein powder?
I haven’t made them without it. The protein powder works like flour in this recipe by soaking up moisture and helping the batter hold together, so leaving it out would change the texture, and I don’t recommend skipping it.
More Pumpkin Snacks and Treats
If you are looking for more pumpkin snacks and treats, here are a few more recipes to bake next.

Flourless Pumpkin Protein Brownies
Equipment
- KitchenAid hand mixer (a stand mixer works too, or mix by hand)
- Clear glass mixing bowl
- 9×9-inch baking pan (glass or metal; an 8×8 works too)
- Parchment paper (optional, instead of the spray)
- Small glass bowl (for the topping)
Ingredients
Brownies
- 1 1/4 cups pumpkin puree plain canned pumpkin (not pumpkin pie filling) or homemade puree with extra moisture drained off
- 2/3 cup natural peanut butter stirred well before measuring
- 1/3 cup unsweetened cocoa powder
- 1/2 cup maple syrup or honey (different flavor)
- 1/3 cup chocolate protein powder plant-based or whey; level cup
- 1 tsp vanilla extract
- 1/4 tsp sea salt
- 1/2 tsp pumpkin pie spice
- 1/2 tsp ground cinnamon
- avocado oil spray for the pan, or line the pan with parchment instead
Peanut Butter Topping
- 1/4 cup natural peanut butter
- 1 tbsp unsalted butter (confirmed unsalted by Allyson)
- chocolate chips a handful (optional)
Instructions
- Preheat the oven to 325°F (160°C). Spray a 9×9-inch baking pan with avocado oil spray, or line it with parchment paper.
- In a clear glass mixing bowl, use a hand mixer to mix the pumpkin puree, peanut butter, maple syrup and vanilla until smooth. (A stand mixer works too, and so does mixing by hand.)
- Add the cocoa powder, protein powder, sea salt, pumpkin pie spice and cinnamon, and mix until the batter is smooth and thick.
- Scrape the batter into the prepared pan and spread it evenly.
- Bake for 20 to 25 minutes, checking at 20 minutes. The edges should look set and the middle should still be slightly soft.
- Let the brownies cool in the pan for 30 to 45 minutes.
- Melt the peanut butter and butter in a small glass bowl in the microwave for about 20 seconds, then stir until smooth. Spread it over the cooled brownies and sprinkle with a handful of chocolate chips, if using.

- Refrigerate for about 2 hours, until firm. Cut into 15 pieces, 3 across and 5 down.
Notes
- Protein powder: I use a chocolate protein powder (Orgain Organic Chocolate Protein powder). Whey works too. Measure a level 1/3 cup and don’t add extra.
- Pan: I use a 9×9 pan, glass or metal. An 8×8 pan works too, and the brownies will just be a bit thicker, so check them at 20 minutes and add a few minutes if the center looks wet.
- Mixing: I use a KitchenAid hand mixer. A stand mixer works too, or you can stir by hand.
- Fudgy center: They’re meant to look slightly underbaked in the middle. They firm up as they cool and chill.
- Sweetener: Maple syrup and honey can be swapped if you’re avoiding cane sugar. They taste different.
- Nut butter: I stick with peanut butter and haven’t tried another. A different nut butter should still work and won’t change the structure.
- Add-ins: Stir in a handful of chocolate chips, chopped nuts or dried cranberries before baking, if you like.
- Storage: Airtight glass container in the fridge for up to 5 days.
- Freezing: Freeze cut squares in a single layer until firm, then store in a freezer-safe glass container with parchment between the layers for up to 3 months. Thaw a few minutes on the counter.
Nutrition
Tried this recipe for yourself? Leave a comment and photos below!
Follow on Instagram, Facebook, Pinterest, and YouTube
Nutrition Disclaimer: Our Family Cooks is not a dietitian or nutritionist, and any nutritional information shared is an estimate. If calorie count and other nutritional values are important to you, we recommend running the ingredients through whichever online nutritional calculator you prefer. Calories and other nutritional values can vary quite a bit depending on which brands were used.


One Comment